Wednesday, May 27, 2015

The History of the Elements and Principles of Art


The History of the Elements and Principles of Art

In a conversation with my husband who is in higher ed, I looked up the wiki for the elements and principles of art (design) in an effort to find out who originally wrote them. Surprisingly, the article does not have that information. Just a couple of lists and definitions and citing to recent texts.

I have now been making an effort to find this information out to possibly update the wiki, but also to help me understand what the original intent of the elements and principles was. I bet that knowing the origins of them will help me understand the best way to use them in the classroom.

So far, these are the texts I have found that I need to read. I will be adding blog posts reviewing each and seeing if they lead me to any others.


1857  -  Elements of Drawing by John Ruskin (stones of Venice)

1900 - Line & Form by Walter Crane

1920 - Composition: Understanding Line, Notan & Color

Sunday, May 17, 2015

Cereal Designers

Third Grade  

Cereal Designers
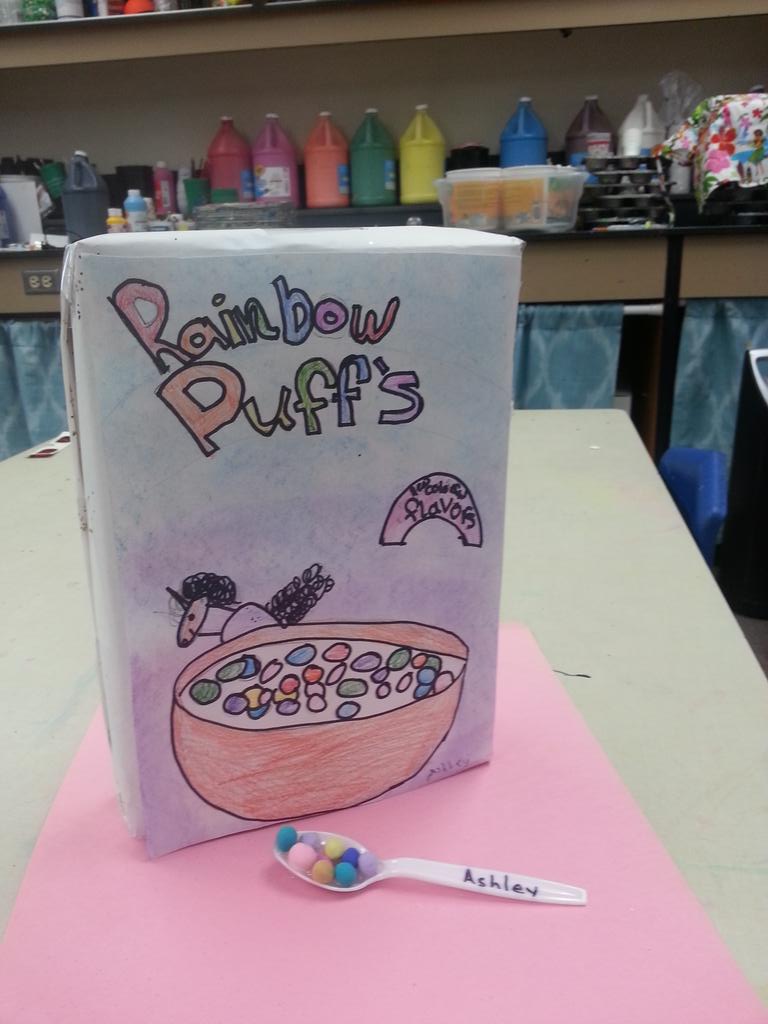
Third graders got to try out two art professions with this project: Food designers and Package Designers. Food designers design the aesthetics of food to make it more pleasurable to look at and eat. The kids used Model Magic clay to create bite sized cereal with unique shapes, color and texture. Next they took on the role of package designer and created a box that sells their cereal. They dissected two cereal boxes to learn what was needed on a cereal box which included a bowl, the cereal, a character, a call-out, and a title.

I knew this project would be fun, but I was really surprised how much the students enjoyed it. One boy in particular who usually doesn't finish art projects to completion made 3 cereal box ideas! I think it was because so much of it was about the idea over execution.  

I split the lesson up into 2 parts:

The first was designing the cereal. I had the kids shape 3-4 bite-sized pieces with model magic focusing on: size, color, shape, and texture. 

The second part was the cereal package designs. We looked at two cereal boxes and compared and contrasted them to make a list of what was important on our boxes. With guidance we decided on having: a bowl, a character, a call-out, and a fancy title. The first day working on the boxes we drew our bowls, out character and the call-out. The second day we finished that up, added pastel rubbed in backgrounds, and  and added the title. We found we needed a 3rd day to finish properly. 


Embedded image permalink

Displaying 20150518_135446.jpg

Displaying 20150518_135434.jpg

Displaying 20150518_135303.jpg

Friday, May 8, 2015

Starry Night

Every Art teacher does some sort of Starry Night right? I try to switch between painting and heavy drawing projects (for my own sanity) so the kinders were ready for painting after designing super awesome cars. Here's how I do Starry night with kinders.

I start out with a Mati and Dada video on Van Gogh. I don't have any time between classes, one goes out one comes in, so the video is a good way to let me set up for the kindergartners. Plus they really relate to the video that talking alone doesn't do. If you haven't seen these videos, they are 7 minutes long and are about a little girl who loves art and just happens to have a robot who can go back in time to take Mati to see her favorite artists.

After the video, I show "my favorite" Vincent Van Gogh painting - Starry Night. I ask only one simple question to the kids and have them talk about the answer with partners and then pick kids to share their answer. I ask them "What is the weather like in the painting and how can you tell?" Such a simple question and they always come up with a windy cold night and talk about the lines and colors.

Next we start painting. I split it into two days. We paint the blue backgrounds the one day with swirly strokes. Then we use marker caps to make about 5 circles evenly across the page. I show them how to make swirls starting at the stamped circles with white paint. I know this will be a hard concept for some kinders so I also give them the option to make concentric circles (something we have used before successfully). Hello differentiation. The kids on the top chose to make the harder swirls and the kids on the bottom made concentric circles.


The second day we added the black and yellow bits. I decided to make it a starry night in our own town of Woodland. For discussion we compared the town where Starry Night is to our own town in Washington. We start the 2nd part of the painting with a black  wavy line (a common vocabulary in my room) for the hills. We added houses on the hills if we wanted to. Then I show them a simple way to make pine trees using some brushstroke skills. Last we add neon yellow paint (that pops) using short lines or dots on top of the White swirls.


Displaying 20150507_155648.jpg

Saturday, April 25, 2015

Reflections from the art room - Templates & Stencils for Elementary Art


On some projects and in some cases I allow kids to use templates or stencils for certain shapes. I know that using templates in the art room is not a popular thing to do (or even the dirty little secret of some art teachers); here are some reasons to keep them around the primary art room.

If you didn't teach how to do it right or well...

If I am teaching a lesson to young kids on say, where to place the features on the head, I don't have time to also teach them how to draw a good oval or egg shape. My class is only 45 minutes plus for elementary you have to limit the amount of instructions to what they can hold in their head. If you have them freehand the oval, inevitably someone or a table full in the class will spend their whole 25 minutes trying to make that initial shape PERFECT. If the lesson is not on how to draw face shapes, then we shouldn't hold them accountable for drawing it freehand if it gives them stress. I mean it is stressing them out because they were not taught how to draw an oval easily and correctly.
Which brings me to...

What you might like aesthetically may not be what the kids like: Alice Neel vs. Vermeer

Robbie Tillotson, 1973 by Alice Neel
You might like that misshapen asymmetrical look of an oval drawn by a child, but the kids see it as a flaw. In their heads they want things precise around the time of 2nd grade up (some of them). You can try and talk them into embracing the beautiful wonkiness of their line (like Picasso loves) but they will leave feeling like they just can't draw and you, the teacher, dooesn't get it. In your head you want the playfulness of an Alice Neel portrait and they want the precision of Vermeer! If the lesson is on creating fluid, freeform lines, don't use one, if the lesson is on something else, then why does it have to conform to your aesthetics instead of theirs?

Straight Edges or Templates - what's the difference

Have you let kids use rulers to create a straight line when needed? What is the difference between that and an ellipse template?

Guaranteeing a size or position

 Sometimes you need a young child to draw the FIRST shape a certain size. You explain how to do it and 90% make it the right size but 10% will always need to restart from the beginning. If you don't catch it right away that can really upset a young artist.

Professionals use them

I am also a still-life artist and my work is  realistic. If I am doing a still-life and the ellipse on a cup is off, it will throw the whole aspect of realism off. So if I have redone one several times and it still feels wrong I will get out an ellipse template. I learned about ellipse templates in art school and later in a workshop with another professional artist.

Still-life with elipses by Nicole Caulfield (me)

It is really just Scaffolding

For more information on scaffolding see Wikipedia Instructional Scaffolding

If you want to teach how to draw a good ellipse or oval - here is a great tutorial I found by Mike Sibley. http://www.sibleyfineart.com/tutorial--draw-ellipses.htm

or buy some of these from Dick Blick for your classroom for when you don't have time to teach everything.
Master Ellipse Maker Template

Thursday, April 16, 2015

Hamster Hot Rod Race Cars

Sometimes it is the simplest projects the kids have the most fun with. The ones that give them a lot of choices.

We were inspired by the book Hamster Hot Rod by Cynthis Lord, illustrated by Derek Anderson. It is an adorable book, very sing songy. It is about a hamster who wants to enter a car race, but needs a race car. The book goes through decisions on how design his car. The kids really enjoy it and they start thinking about their decisions on their own car at every page.

(I need to warn you not to google the name of that book. Apparently there are rated x pics that use the same key words. If you want to see it go to amazon and look it up!)

Front cover

I start out teaching them howto draw a car in a few different ways. All of the examples start with a basic rectangle and two circles. Then they need to decide on a shape for their front end, a shape for the back end, and accessories. I don't make them choose what I showed them, but it helps get their ideas flowing by seeing a few ways to do it. I do however make them all start with the basic rectagle and wheels as the basis and have templates for just those shapes for them to trace around that way they all end up roughly the same size and since we will be adding onto the rectangle to make the shape of the car the templates won't deter their creativity.

Below, some student examples of day one of the assignment. We will work on it one more day and add wheels that spin with brass fasteners, cut it out,  and some sort of bling (yet to be determined).


Monday, April 6, 2015

Black Light Art Show

Using blacklights to create a buzz in the art room and a presentation goal at the end

Like it or not visual arts sometimes needs a gimmick to get the community pumped about going to see an art show. School music shows and theater don't have that problem. People always want to see their kid in action, but with visual arts the action is already finished in the classroom.


I decided this year to have the kids create an art show centered around blacklights. The kids spent the entire month working on artwork, backdrops, and advertisements in the dark  to get themselves and their families excited about the show at the end of the month (which coincided with conferences). The results: a magical show that created quite a few "Whoas" and "Ahs!"


 The Supplies

What Glows Under UV

I decided to make the show into a theme of a garden so all of my activities stemmed from that idea with a few exceptions.
The first step was to figure out what materials glow under a blacklight. I started with testing things I apready had in my room and then went shopping to test for more. Some things glow more than others. The best materials I found were:
  • Crayola Fluorescent Tempera (blue doesn't glow but can be mixed with red and yellow)
  • Walmart Fluorescent Tempera (including blue)
  • Highlighters (most yellows, some pink and orange)
  • Neon Sharpies
  • Crayola Extreme Colored Pencils
  • Neon colored pipecleaners and puff balls
  • Neon ribbon
The Blacklights

I didn't purchase glow in the dark paints. I used blacklights to make fluorescent things glow. The glow in the dark paints do however glow under a blacklight, but they are more pricey. There are two choices for blacklights whichI used a combination of.

1. Blacklight lightbulbs (from Home Depot or Walmart). These work really well together, but the downside is they get hot. They work well for spotlighting the show. They cost $5 each.

2. Strip Lights. These stay cool and give even light. Great for kids testing their artwork and drawing in front of. I paid $20 on ebay for mine.

Painting in the Dark

I really wanted the kids to experience painting with glowing materials in the dark. We tried a few ways of doing it.

1. When they were already working on their artwork I would turn out the lights and put on the blacklights for a couple minutes at a time. The kids really enjoyed this but of course lost focus on their paintings.


2. When the lights were on the kids could test their artwork to see how it glowed at 2 test stations on either side of the room. The paint glows so well that even with the lights on they could see it glow if it was near the light.

3. The day of the exhibition since I had the room cleared of furniture, I passed on art boards, paper and highlighters and we played some drawing games.

The Projects

Kindergarten Flowers
The green stem is actually yellow highlighter that glows light green. The blue around the flower is the white paper showing.
One 2nd grade class made more sophisticated flowers learning how to blend colors on the petals.
3rd Grade Lizards

2nd Grade Frogs with patterns on the belly

3rd Grade Negative Portraits.
We started with black paper and painted the faces and the backgrounds with fluorescent paint.


3rd Grade Positive Portraits. 
This class made portraits on white paper and put them on a black background. 


2nd Grade Snails

1st Grade Turtles


3rd Grade Owls on black paper with glow background.


1st Grade Shootong Stars

The Exhibition


Below are the 4 walls of the exhibition. I decided to not display the art in the traditional grid style but instead to create backdrops or landscapes that the art lived in. The decision was partly due to how many kids I had in the school (580)  as well as wanting to create a full experience for the kids that are K-3rd grade.


Paper Panel Walls


To create a gallery in my classroom I had to erect butcher block walls on two sides of the room attached to the ceiling grids. The paper walls hid my desk, cabinets and countertops. I took my tables out of the classroom for the week of the show.  I added duct tape to the top of the butcher paper that I could pierce my grid clips through and attach right to the gridwork. To make the bottom display straight I  folded over the bottom edge and stapled it to create a pocket for a yard stick to slide into.


 Here is the wall finished. You might notice that the paper is white in the sky area but on the photo with the blaclight it appears blue. Some white paper will glow blue under blacklights which worked perfectly for our sky.

Hands-On Activities


As part of the show I had stations with hands-on activities. On the counter on one side of my room I had science information about blacklights and several examples of things that glow with a black light that people at the show could touch and move.

From Nature:
  • Rocks from nature (I purchased on ebay)
  • Feathers
  • Glowfish (real GMO fish from Petco that glow)
Manmade:
  • Paints
  • Highlighters
  • Stickers, Pipecleaners etc
  • Tonic Water
 I also put a flashlight out for people to see what colors the paint was when we painted in white light. I explained why this phenomenon happens in class with a Power Point presentation and printed out the slides and displayed them for the show.  Here is the link to the slideshow.
 
Counter with hands-on activities.

Edit: Now that the show is over I keep on finding more things that glow! Here's one I've tested. You can mix in highlighter marker into Model Magic! That opens more 3D options!